
Design and Under the Hood (D17).
D17 has a similar footprint to D16, measuring 145mm x 86.3mm x 31.6mm and weighing 470g, just a touch bigger than D16 and about 150g heavier due to added components. Overall, it has a similar, familiar brick shape to the D16 and PB5. Approximately 2/3 of the top is occupied by a glass panel with a small 1.3” OLED built-in display and a window showcasing 2x Korg NuTubes, in a way, combining D16 and PB5 top panel design. The rest has a ridged “heatsink” type of surface, at the top and sides. At the bottom, you will find a fancier pattern including “R2R” engraving. I guess, despite also having 1bit DAC mode, R2R is in the spotlight here. The design continues to have an industrial-hardware look, similar to D16, with the addition of front-panel side guards that you can even clip a lanyard or belt to. When you wrap D17 in the included leather case, all the “ridges” are covered except for the bottom ones under the metal cutout, which improve airflow for extra cooling.
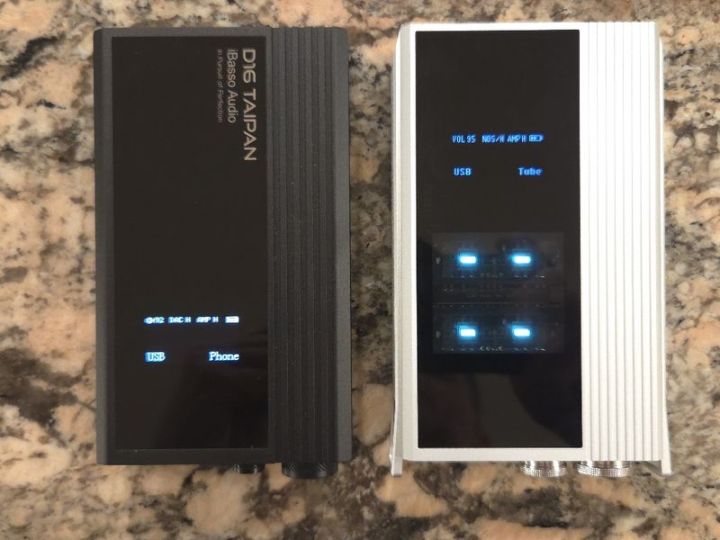
The front of D17 has 4.4mm BAL and 3.5mm SE ports, which double as either headphone output or Line Out, selectable from settings. To the right of the headphone jacks, you have a smaller knob that doubles as a digital DAC volume control or a Selector Switch. Press once to turn the display on/off. Long-press and hold to enter the Settings menu, which is visible for a few seconds, then returns to a default view if you don’t press anything. But if you rotate this Selectable Switch, you can cycle through various Settings, such as AMP gain (H/L), DAC Gain (H/L), DAC Mode (NOS, OS, SD), Input (USB/COAX/OPT), Output (Tube or Line), Balance (L/R), Backlight (always On, 10s, 20s, 30s), and Version number.


I find it to be a significant improvement in D17, having a more logical navigation control, where you rotate the knob to step through the menu options and press the knob to change the value. In D16, it was the opposite, pressing to step through and rotating to change the value were less intuitive. The default screen view displays all essential settings in one place, including digital DAC volume, Mode setting, DAC and AMP gain, battery level (in 3 segments), and selected Input and Output settings. My only gripe here is that iBasso made the selector knob bigger than in D16. From a usability perspective, the larger digital/control knob on D17 leaves less space next to the big analog volume knob, making it a bit harder to grab. Actually, I wish the analog volume knob would extend a bit further out.


Next to the Selector Switch knob, you will find the Analog Volume control. Yes, it is the exact analog stepped attenuator with 24 steps, used in DX320Max, DC Elite, D16, and PB5. By design, the volume will drop between the “steps” as they disengage. It was a bit cumbersome in the DX320Max to adjust the volume in 3dB increments, while the DC Elite had an additional 1dB volume micro-adjuster button. With D17, as with D16, you have Digital Volume control (DAC output) for such micro-adjustment. I usually set the digital volume to 95 to have extra headroom, then micro-adjust it after settling on one of the 24 steps of the analog volume control. Another thing to keep in mind, especially when using IEMs, is that I usually set the stepped attenuator to a lower level before plugging in the cable, then adjust to avoid blasting my ears. This is especially important since there is no analog volume indicator on the D17 knob, though you can always add a slim electric tape strip, as I have done on DC Elite.
On the back, you have a combined COAX (PCM768kHz / DoP256) and OPT (PCM192kHz / DoP128) input port, followed by 2x USB-C ports: one for USB DAC input (PCM768kHz / DSD512) and another for charging. Next to the charging port, you have a blue LED indicator and a toggle power switch. The switch is small, but I already got used to it since it’s the same as in D16. It is a good idea to charge the device separately rather than combine it with a DAC input while draining its battery (smartphone or tablet). Plus, while I was using the DX180 DAP as a source, I was able to connect the DX180 to the D17 via COAX while charging the DAP and the D17 independently, which was very useful for a desktop application. And speaking of charging, the USB-C port supports 5V/3A or QC3.0 quick charging, with a charging time of about 2.5 hours and a playtime of about 15 hours (best case scenario). To better isolate from interference, D17 uses separate batteries powering the DAC and headphone amps; however, both are charged from a single USB-C port.


Inside D17, everything has been redesigned. First of all, there are two discrete DACs, both in-house developed by iBasso. One is R2R, a four-channel, fully balanced, symmetrical, discrete-component DAC that uses 284 high-precision film resistors (0.01% accuracy). The other one is more familiar from other iBasso designs, a 1bit DAC with a four-channel design, combining a total of 64 PWM-DAC elements. Both DACs are under a new custom FPGA-Master 3.0 control, introduced in the DX340 DAP, with nanosecond-level I/O precision to align signals and compensate for any delay.
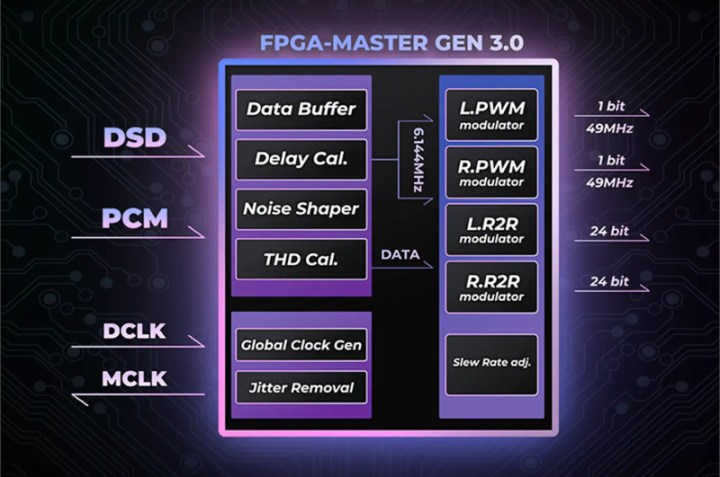
This dual R2R and 1bit architecture is translated into three separate DAC modes. One is NOS (no oversampling), where the incoming PCM data is processed by R2R DAC decoding, and DSD data is processed by 1bit DAC decoding. Another is OS mode with oversampling, where all incoming data is converted to PCM format and decoded by an R2R DAC. The third one is SD mode, another oversampling mode that converts all incoming data to DSD format and decodes it with a 1bit DAC.
Now, to a big surprise, the output of D17 uses dual Korg 6P1 NuTubes, which, in theory, is like an addition of PB5 inside D17. Those tubes have been used in many designs and are very reliable with a 30,000-hour operational rating. With its anode at 24V and paired with high-performance TI BUF634A op-amps, they can deliver up to 1.2W @ 32 ohms (7Vrms) in R2R DAC mode from a 4.4mm BAL output (1.9 ohm output impedance) under high-gain AMP and DAC settings. The 3.5mm SE output (1 ohm impedance) scales it down to 3.5Vrms/320mW. Interestingly enough, in 1bit DAC mode, the output power is much lower: 3.5Vrms/340mW from a 4.4mm output and 1.7Vrms/87mW from a 3.5mm output.
Just one gripe here: when you switch the output from PO (tubes) to LO (for external amp connection), NuTubes are still lit up, and at one point, I forgot to check the display and missed that the Line Out was enabled, blasting my ears after connecting IEMs. This wasn’t an issue with D16, which had no NuTubes. I learned my lesson and paid closer attention to D17’s display.
And last but not least, like D16, there are two Torx 8 screws on the back of the chassis, which you can easily remove to slide out the top panel, replace the battery, and take a peek at the inside circuitry.


Design and Under the Hood (PB6).
While the PB5 exterior design had a nearly identical footprint to match D16, PB6 is an all-new animal. With dimensions of 140.7mm x 78.9mm x 19.6mm and a weight of 293g, it is smaller, slimmer, and lighter than its predecessor. When it comes to PB6, relative to PB5, everything here has been updated, inside and out. The all-aluminum top-and-side design has only a small window at the top to display the glow of four JAN6418 tubes, and an all-glass bottom panel with “PB6 MACAW” print. There are no heatsink ridges, but the design carries a familiar industrial look with front panel side guards, to which you can also clip a lanyard or belt. There is no case included with PB6, maybe as part of keeping the price so low, although the case shouldn’t be that expensive, and I think an optional case will be available soon, directly from iBasso. The chassis is slick, and I already dropped it by accident from shoulder height onto the tile floor of our kitchen. The good news is that it still works! The tubes are not damaged, and there are no scratches on the aluminum surface, except for a tiny chip in the corner of the glass back panel. Not that I recommend anybody to try it, but that was actually very impressive!
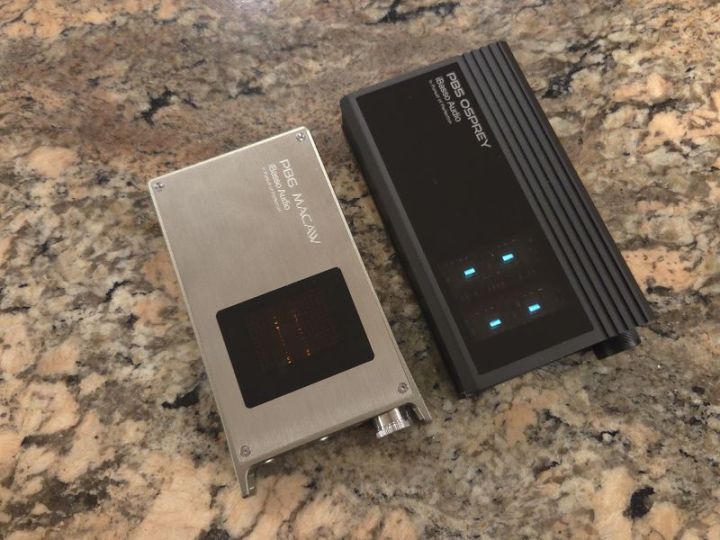
As already mentioned, there are quite a few changes on the inside and outside. Starting with the front, you will get 4.4mm BAL and 3.5mm SE outputs, and 4.4mm BAL and 3.5mm SE inputs, side by side in two recessed pockets of the front panel. For those who remember PB5, it only had a 4.4mm input, meaning you couldn’t use it with DAPs or other single-ended-only sources. This is no longer an issue with PB5, which can accept either input and convert to either output, making it especially convenient for single-ended-only sources that can be converted to balanced output.


The volume control no longer uses a 24-step analog stepped attenuator like in PB5 or D16/17. Instead, it uses a high-precision 4-channel volume control based on the popular NJW1195A IC, with a fine adjustment of 0.5dB per step. One of the reasons for this change was to reduce background noise and ensure consistent left-right channel balance, without the engagement/disengagement blank “pauses” caused by the stepped attenuator. As a bonus, the rotary knob powers off with a click at full counter-clockwise rotation, so there are no ear-blasting surprises when powering up the amp, since you start from zero.
On the back, you will find another pleasant surprise: a 12V DC input, similar to the DX340 amp cards, that lets you connect an external DC power source (wall charger included) to bypass the internal 8.4V high-voltage battery for a cleaner power supply and higher output power. Next to it is a USB-C charging port for its internal battery, which requires only a 5V charger. With the battery, you get about 13.5 hours in Solid-State Class AB mode, BAL output in high gain and low bandwidth, which scales down to 9.5 hours when you switch to Tube mode with higher drain due to vacuum tubes. Or, you can bypass the battery and use a 12V DC input to achieve closer to desktop performance.
Next to DC In and USB-C charging ports, you have three small, identical toggle switches. Everything is clearly labeled, and with the aluminum chassis color finish and black labels, it is easier to read. However, it is still an eye-straining test for my aging eyes, especially since I’m in denial that I need glasses. It takes a little time to remember which switch does what, to avoid toggling the gain switch when using IEMs, and to remember that the middle switch adjusts the bandwidth filter, while the last switch toward the corner toggles between Class AB and Tube modes. There is no OLED display here to reflect the switch position; however, you will know when tubes are on since they won’t be lit in solid-state mode.
Speaking of indicators, next to the DC In port is a small pinhole with a status LED light that indicates when a proper 12V input is detected. Next to USB-C, another pinhole with a green LED will pulsate during charging. The same LED is used to estimate the remaining battery life, a significant improvement over PB5, where you had to guess based on the full and low charge indicators alone. In PB6, when this LED is solid green, the device is fully charged at 75-100%; when the light is blue, the battery is at 50-75%; when it turns red, the battery is at 25-50%; flashing red at 1sec intervals is 5-25%, and super-fast flashing at less than a second interval means below 5%.


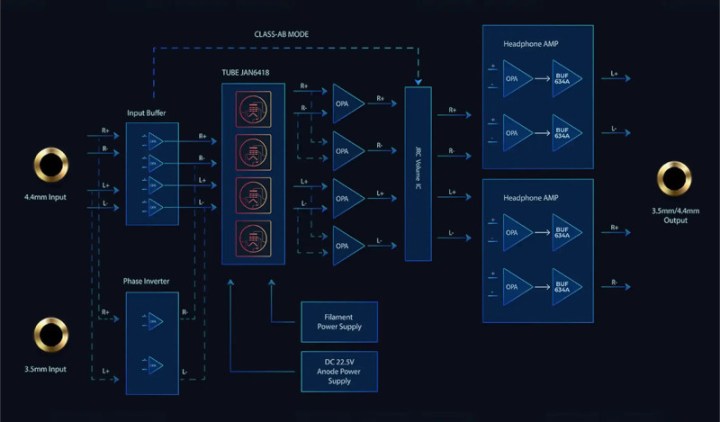
The high- and low-bandwidth filter toggle produces a noticeable sound effect, which I’ll cover in the sound analysis section of the review. I wanted to mention here that it’s not a gimmick but does have a significant effect on sound shaping. And, of course, many will look forward to Tubes (JAN6418) vs Class AB solid-state amp comparison, which also shows a noticeable change in sound. In theory, you have four different sound modes between these two toggle switches. iBasso implements Class AB solid-state amp output in many of their devices and modular amps, using a standard OP+BUF opamp circuit with four BUF634A ICs for current amplification. Lately, they have also adopted popular JAN6418 tubes in the amp16 and Nunchaku dongle, using a custom 22.5V anode power supply. Here, they use four JAN6418 for additional sound coloring, with tubes mounted on a suspension using PORON damping material to isolate vibrations, and the entire assembly is covered with a metal mesh shield to block electromagnetic interference. Just keep in mind that when switching between Tube and Class AB modes, as shown in the PB6 block diagram, you are either enabling or bypassing tubes in the audio signal path.
The output spec is very impressive, and I used only low gain in my testing. In general, PB6 can be used with both sensitive IEMs and demanding headphones. But with sensitive IEMs, you might need to lower the input signal level to increase the dynamic range for volume adjustment. According to the PB6 spec, with 4.4mm Input and Output (1.2 ohm output impedance), you will get 1.6W @ 32 ohm, assuming an 8.5 Vrms output with an internal 8.4V battery. This scales up to 2.3W with a DC 12V input and an output level of 9.5Vrms. With 3.5mm In/Out, the power output is 660mW with either battery or DC In.
Unlike D16, D17, and PB5 designs, PB5 uses four Torx 5 screws on the top of the chassis, which you can easily remove to lift the top panel, replace batteries, and take a peek at the inside circuit and its components.


Page 3 – Sound Analysis and Pair-ups.
Page 4 – Comparisons, Source pair-ups, and Conclusion.

Just wondering if you could compare the D17 vs the A&K SE300 since they’re both R2R?
LikeLike
SE300 is oldie but goodie. Unfortunately, I covered that one years ago and it was on loan. Sorry.
LikeLike